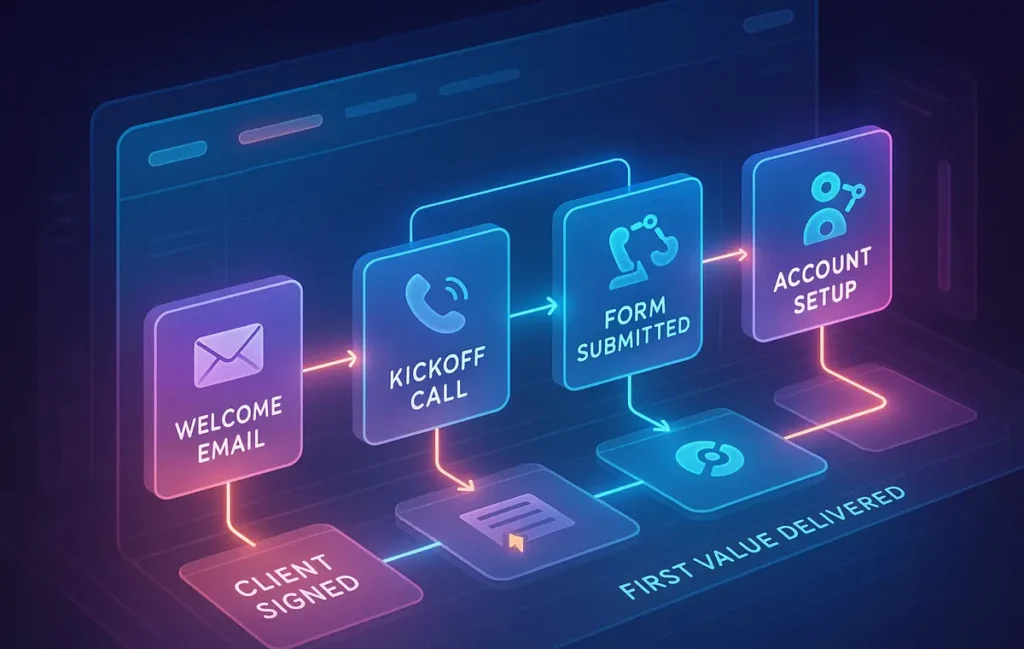
To automate client onboarding, first design a clear end-to-end journey (stages, data, touchpoints, timings), then turn it into one standard onboarding package, task checklist, and 7-email sequence. Automation tools only come last. A good onboarding engine should run without you—but still feel personal to every client.
🚀 Intro — Onboarding Isn’t Admin. It’s Your First Delivery
Most service owners think of onboarding as paperwork: contracts, invoices, forms, and a welcome email you write at midnight. In reality, onboarding is your first real delivery. It’s the moment a client decides, “This feels professional—I’m in good hands,” or “Uh oh, this might be a mess.”
When onboarding is improvised, you feel it everywhere. You’re chasing logins on WhatsApp, rescheduling kickoff calls, forgetting small but critical questions, and answering the same “What happens next?” email over and over. Your calendar gets cluttered, your attention gets fragmented, and your reputation quietly suffers.
A well-designed onboarding system does the opposite. It turns the fuzzy first 7–21 days of a project into a predictable journey with clear stages, expectations, and triggers. Clients know what’s happening. You know what’s happening. And most of the “busywork” steps—emails, reminders, task creation—happen automatically.
For solopreneurs and small teams, this is even more critical. You don’t have an ops manager to clean things up. You are sales, delivery, support, and operations in one. If onboarding is noisy, your entire week is noisy. That’s why on NerdChips we treat onboarding not as a side admin thing, but as a core business system.
In this guide, we’ll build a standard onboarding blueprint: your stages, data, tasks, emails, and automation logic. Then, if you want to go deeper into the tools side and no-code implementation, you can extend it with guides like Automating Client Onboarding Without Coding once the foundation is in place.
💡 Nerd Tip: Treat onboarding like a mini product launch. Every new client is “launching” into your ecosystem—design that launch with intention.
🗺️ Before You Automate: Map Your End-to-End Client Journey
Before any workflow automation or fancy triggers, you need a clear picture of what actually happens from “Yes, I’m in” to “First result delivered.” Without that, automation just makes a messy process faster—and more confusing.
A good client journey map is simple. You’re not trying to capture every micro-event, just the major stages that every client moves through. In most service businesses, you’ll see five:
-
Lead Becomes Client (Contract + Payment)
-
Intake & Requirements
-
Setup & Access Collection
-
Kickoff & Deliverables Timeline
-
First Value Delivery
Instead of treating these as a vague sequence, write them down and decide what “done” means at each stage. When you do that, the rest of your onboarding system becomes much easier to design.
🔐 Stage 1 — Lead Becomes Client (Contract + Payment)
This is the moment where “I’m interested” turns into “I’ve committed.” Your job here is to make the transition as smooth and confident as possible.
First, decide what counts as the official “start” of onboarding. For many service businesses, the trigger is a signed contract and first payment received. For others, it might be a signed proposal. Whatever you choose, define it explicitly. This is important because your automation will later use this trigger to start the onboarding sequence, and you’ll connect it to your invoices and payment workflow—something you can streamline further with systems similar to those in Automating Invoice Creation and Payment Reminders.
At this stage, you want to reduce friction. That might mean using e-sign links instead of PDFs, one payment link instead of back-and-forth bank details, and clear language that explains what happens after they sign and pay. Many clients feel a small moment of panic after paying; your onboarding will either amplify or calm that.
📥 Stage 2 — Intake & Requirements
Once the client is officially in, you shift from “Yes” to “Tell me who you are and what you need.” This is your intake stage, and it’s where many solopreneurs lose momentum.
A strong intake process is focused and respectful of your client’s time. Instead of sending five different emails with scattered questions, you want one structured intake form or questionnaire that gathers:
-
Core business details
-
Project goals and constraints
-
Any must-have preferences or red lines
-
Key metrics or definitions of success
The trick is to ask only what you will actually use in your process. If you collect data you never reference, clients feel like they’re filling out a form for your convenience, not their outcomes.
An automated system shines here. As soon as Stage 1 is complete, the intake form is sent, reminders are scheduled, and you can see at a glance who is “stuck” and who is ready for the next step.
🗝️ Stage 3 — Setup & Access Collection
This stage is where you gather the practical access you need to actually do the work: analytics logins, ad accounts, website access, code repositories, product catalogs—whatever your service requires.
Instead of improvising every time, define one standard “Access & Setup” checklist. It should spell out:
-
The accounts and tools you need
-
Which ones are optional vs. mandatory
-
How clients can share access safely (no raw passwords in email)
-
What you will configure for them vs. what they must configure
By turning this into a repeatable step, you avoid the familiar chaos of chasing credentials across email threads and chat messages. It also becomes easy to plug into workflow tools later on, especially when paired with modern workflow automation software that can route tasks and notifications.
🎬 Stage 4 — Kickoff & Deliverables Timeline
Once you have intake data and access, you’re ready for kickoff. This is where you align expectations and timeline.
A solid kickoff stage answers five questions for the client:
-
What exactly are you doing for me?
-
What will you need from me over the next 30–90 days?
-
What are the key milestones and dates?
-
How will we communicate (tools, cadence, response time)?
-
How will we know this is working?
When clients leave kickoff with a clear timeline and communication plan, most “just checking in” emails disappear. This is also where you share your onboarding guide or client playbook—part of the standard package we’ll define shortly.
🎁 Stage 5 — First Value Delivery
The final stage in your onboarding map is “First Value Delivered.” This isn’t about finishing the entire project—it’s about getting the first meaningful result or artifact into the client’s hands.
That could be:
-
A strategy document
-
A first campaign draft
-
A live dashboard
-
A quick win implementation
In practice, businesses that deliberately design this “first value” step often see happier clients and lower churn. Clients feel progress quickly and stop worrying about whether they made the right decision.
💡 Nerd Tip: When mapping your journey, ask: “What is the minimum thing I can deliver that proves we’re moving in the right direction?” Design onboarding to reach that point as fast as possible.
🧩 The Core Components of an Automated Onboarding System
Now that you have the journey, you need the building blocks. An automated onboarding system isn’t just a couple of zaps or scenarios; it’s a set of standard assets that every client passes through. Think of this as your onboarding “starter kit.”
We’ll break it into four components: a standard intake package, a data collection layer, a task activation layer, and a communication layer.
📦 1 — A Standard Intake Package
Your standard intake package is what every new client receives without you having to think. It’s consistent, polished, and designed once—then reused dozens or hundreds of times.
Typically, it includes:
Welcome email
This is your “You’re in, here’s what happens now” message. It reassures the client, introduces the onboarding process, and links to the assets they need (portal, forms, planning docs). It should sound like you, not like a generic corporate template.
Onboarding guide
A short PDF or page that explains, in simple language, how your process works. It covers stages, timelines, communication rules, and responsibilities. Clients often read this once and then refer back when they feel lost.
Video walkthrough
A 5–10 minute screen-recorded tour that shows where everything lives: the client portal, shared folders, project board. People remember visuals better than text, and this single asset can eliminate a huge number of “Where is X?” questions.
Expectations + scope summary
Even if it’s in the contract, restate scope in plain language. What’s included, what’s not, and how change requests work. This reduces scope creep and protects your time.
Timeline snapshot
A visual or short list of the main milestones: kickoff, first draft, review, first campaign live, etc. If you run recurring services, you can outline the first 30–60 days.
Once this package is defined, your automation will simply plug it in at the right moment—no more rewriting the same welcome email from scratch.
🧾 2 — Data Collection Layer (Forms + Requests)
Your data collection layer is where your process meets reality. It covers everything you must know before doing good work: goals, constraints, assets, guidelines, and context.
A strong data layer balances depth and usability. You might have:
A structured questionnaire
This captures essentials: business overview, target audience, past efforts, current problems, and definitions of success. For example, instead of asking “What are your goals?”, you might ask “What would a successful first 90 days look like in your words?”
Assets upload section
A place where clients can upload logos, brand kits, product photos, existing copy, or whatever else you need. Ideally, it’s centralized—one link, not ten.
Brand guidelines
You either collect their brand guidelines or, if they don’t have any, give them a simple template to define voice, tone, and non-negotiables. This step alone can reduce a lot of revisions.
Logins & permissions
For security, you might direct them to a password manager share link, limited access accounts, or specific instructions on how to invite you to platforms. This keeps you away from raw passwords in email threads.
Once this data layer is standardized, it becomes a natural candidate for automation and integration with your internal systems, especially if you later pair it with workflow automation software to route submissions and trigger tasks.
✅ 3 — Task Activation Layer (Your Internal Checklist)
Behind the scenes, you need a way to turn all this information into action. That’s your task activation layer: the internal checklist and task creation logic that keeps your work on track.
This typically includes:
-
A kickoff checklist that ensures everything is in place before the first call
-
Verification steps for assets (e.g., test logins, check pixel installation, confirm tracking is live)
-
Initial tasks: drafting strategy, setting up dashboards, preparing kickoff documents
-
Creation of a project folder with a consistent naming structure
-
Updating your CRM or tracker with a clear status tag such as “Active – Onboarding”
Instead of keeping this in your head, you define it once as a checklist or template. Then, when onboarding starts, your automation creates a fresh copy of that checklist and assigns tasks to you or your team.
💡 Nerd Tip: If you ever think “I’ll remember this step next time,” you probably won’t. Add it to the checklist once and let the system remember for you.
📡 4 — Communication Layer
The last component is communication: messages, updates, and gentle nudges that keep clients informed without you manually drafting each one.
In an automated onboarding system, your communication layer usually includes:
-
A welcome sequence that sets expectations and guides clients through the steps
-
Status updates when key milestones are reached (“We’ve received your intake form”, “Your kickoff call is scheduled”)
-
Reminders if clients haven’t completed critical steps (like forms or access sharing)
-
“Next steps” messages after major events, such as the kickoff call
This is where automation shines. Once the logic is in place, clients receive timely, relevant messages while you focus on actual delivery. If you later want to get more advanced, you can borrow patterns from advanced email flows like those used in Email Automation for Shopify Store Owners to personalize messaging based on client behavior.
🧠 Build the Automation Logic (Tool-Agnostic Blueprint)
Now that the components exist, we can design the actual automation flow—without locking ourselves into a specific app. Think of this section as the “wiring diagram” for your onboarding engine. Once it’s clear, you can implement it using no-code tools, CRM automations, or project management rules.
🔔 Step 1 — Trigger: Client Signs Contract / Pays Invoice
Every automation flow needs a clear starting event. In onboarding, that’s usually:
-
Contract signed in your proposal/contract tool
-
First invoice paid in your payment system
When this happens, you want three things to kick off automatically:
-
The onboarding sequence is started
-
The project is created in your workspace with the right template
-
The client is tagged as “Active – Onboarding” in your CRM or tracker
If you already use automated billing or want to improve that side, study patterns from systems like Automating Invoice Creation and Payment Reminders. The cleaner your payment trigger, the more reliable your onboarding flow will be.
📧 Step 2 — Auto-Send Welcome Package
Once the trigger fires, your system sends the standard welcome email and links to:
-
Your onboarding guide
-
The client portal or shared folder
-
The intake form
-
The scheduling link for the kickoff call (if you book early)
This email should feel personal even if it’s automated. Use the client’s name, reference their project type, and reiterate why you’re excited to work together. Automation handles the timing; you handle the voice.
📂 Step 3 — Auto-Create Onboarding Tasks / Folders
In parallel with the welcome email, your system should create:
-
A project folder with the correct naming convention
-
A copy of your onboarding checklist
-
Core tasks for you and your team (e.g., “Review intake form”, “Test access”, “Prepare kickoff deck”)
Many tools can do this, but the concept stays the same: one trigger creates a fully prepared project space with the right structure. That’s how you scale without your brain being the project template.
📑 Step 4 — Auto-Request Required Assets
Once the welcome is sent, the next step is asset collection. Your intake form and access instructions should be part of the automation. When a client hasn’t completed the form after a few days, a gentle reminder goes out.
You can also branch logic here. For example, clients who select “I already have brand guidelines” might skip certain questions, while those without guidelines receive a lightweight template to fill out. This is simple, non-technical personalization that makes automation feel less robotic.
📅 Step 5 — Auto-Schedule Kickoff Call
Your onboarding flow should prompt clients to book a kickoff call at a sensible time—ideally after they’ve completed intake and shared access. Your automation can:
-
Send the scheduling link only after key steps are done
-
Tag clients who haven’t booked yet and send a reminder
-
Add the call to your calendar with the right project references
The goal is to avoid back-and-forth scheduling emails. When clients can see a clear path (“Fill form → share access → book kickoff”), they move faster.
🔄 Step 6 — Auto-Move Client to “Active Fulfillment” Stage
Once the kickoff is done and first tasks are activated, onboarding is over. Your system should:
-
Update the client status from “Active – Onboarding” to “Active – Fulfillment”
-
Trigger any recurring delivery workflows (monthly reporting, sprints, etc.)
-
Optionally send a short “Onboarding complete, here’s what we’re focusing on now” message
This status change is more than a label. It’s a line in the sand: onboarding is a designed experience with a clear beginning and end, not an endless fuzzy period.
💡 Nerd Tip: Design your automation logic on paper first. If you can’t explain it in simple steps, no app will magically make it clearer.
🤝 Client Experience Layer — Make It Feel Personal (Not Automated)
Automation should never feel like you’ve replaced yourself with a bot. The best onboarding systems are “automation-first” but “human-led” at key moments.
There are three levers you can use to keep things personal:
Personalization tokens
Using names, company names, and project types is a basic start. But you can go further by adjusting wording based on whether a client is brand new to your service or upgrading from a previous package. Simple conditional copy can make emails feel written just for them.
Branching paths based on client type
A Shopify store needing email marketing support will have different needs than a B2B SaaS company hiring you for analytics. Your system might branch the intake questions and resource links. If you’re curious about ecommerce-flavored email flows, you can borrow ideas from playbooks like Email Automation for Shopify Store Owners and adapt them to your service onboarding.
Human-in-the-loop checkpoints
Not everything should be automated. Certain moments deserve a manual touch: sending a quick Loom with custom feedback, writing a personal note before kickoff, or hopping on a short call when something seems unclear. The point of automation is to buy you the time and mental space for those higher-value touches.
If you’re a solopreneur or remote team, this balance is crucial. You can lean on curated tooling overviews like Automation Tools for Solopreneurs & Remote Teams to decide where to plug in automation, but your client experience still needs to feel distinctly you, not like a generic agency with templates.
📬 The 7-Email Automated Onboarding Sequence
To glue all of this together, you’ll design a simple 7-email sequence that runs automatically for every new client. Each email has one job: move the client to the next step while reinforcing trust.
Here’s a blueprint you can adapt.
Email 1 — Welcome + Expectations
This email fires right after the trigger. It thanks the client for trusting you, explains how onboarding works, and links to the key assets: portal, form, guide. Keep the tone warm and clear. Make sure you explicitly say, “Here’s what happens next over the coming days,” so they can relax.
Email 2 — Your Client Portal / Project Folder
This message focuses on orientation. You show them where documents live, how to access tasks or updates, and how to contact you. Include a screenshot or short Loom if possible. The goal is for clients to feel “Ah, I know where everything is” within 24 hours.
Email 3 — Intake Form
This email is all about data. You remind them why the form matters (“This helps us avoid guesswork and move faster”) and give a realistic estimate of how long it will take. If they haven’t filled it out after a few days, the system sends a polite nudge.
Email 4 — Resources + Pre-Kickoff Material
Once the form is done (or after a set time), you send resources to prepare for kickoff: your guide, FAQs, maybe a short checklist like “3 things to think about before our call.” This primes them for a productive conversation and reduces time spent explaining basics.
Email 5 — Kickoff Call Scheduler
Here you push for action: “Let’s book your kickoff call.” You link to your calendar and set expectations for what the call will cover. If your system can detect whether the intake is complete, you can send this only when they’re ready.
Email 6 — Milestones & Deliverables Snapshot
After the kickoff is scheduled or completed, this email summarizes what you agreed: goals, milestones, dates, responsibilities. It’s like a written echo of the conversation and helps prevent misunderstandings later.
Email 7 — “What Happens Next” Transition Email
Finally, you close the onboarding loop. This email says, “Onboarding is complete, and we’re now entering delivery mode.” You might restate the next 30 days and give them one place to check progress. This is also a good moment to set boundaries around communication so you can work deeply without constant interruptions.
💡 Nerd Tip: Write these emails as if you were sending them manually to your ideal client. Only after they feel right do you put them into your automation system.
⚡ Ready to Turn This Blueprint into Clicks, Not Chaos?
Once your onboarding journey is mapped, the right automation platform can wire it all together—triggers, tasks, and email flows—without drowning you in complexity.
📊 Measurement: How to Know Your Onboarding System Works
A beautiful flowchart is useless if it doesn’t change reality. To know your onboarding engine is doing its job, track a few simple, practical metrics.
Time-to-first-value
This is the number of days between “client committed” and “first meaningful result delivered.” When teams standardize onboarding, they often see this drop by 30–50%. Faster first value means less anxiety and more trust.
Time-to-asset delivery
Measure how long it takes clients to complete the intake form and share required access. If this number is high, your instructions may be unclear or your form too long. You can experiment with splitting the form into two steps or improving the explanatory copy.
Number of manual touches
Count how many onboarding emails and messages you send manually. The goal isn’t zero (you want some human touches), but you should see a clear difference after automation: fewer “Where are we?” messages, more focused questions.
Onboarding satisfaction score
You don’t need a big survey. A simple question like “On a scale of 1–10, how clear did the onboarding process feel?” at the end can give you a trend. If scores are low, look at where clients seem confused.
Drop-off points
Finally, watch where clients stall: is it at the intake form, access sharing, or booking the kickoff? Each stall point is a signal to improve clarity, automation, or the resources you provide.
| Stage | Owner | Automation Level | Success Signal |
|---|---|---|---|
| Contract & Payment | Client + System | High (triggers) | Onboarding sequence started |
| Intake & Requirements | Client | Medium (reminders) | Form completed |
| Setup & Access | Client + You | Medium (tasks) | Access verified |
| Kickoff | You | Low (scheduling) | Call completed |
| First Value | You | Low (creative work) | Deliverable sent |
💡 Nerd Tip: Don’t chase “perfect” metrics. Start with what you can measure easily, then add sophistication later. The goal is direction, not a dashboard for its own sake.
🟩 Eric’s Note
I don’t trust any system that only works on your best days. A good onboarding flow should carry you even when you’re tired, behind, or juggling too many projects—and still make clients feel like they’re your only one.
📬 Want More Smart Systems Like This?
Join our free NerdChips newsletter and get weekly breakdowns on automation, workflows, and future-proof client systems—designed for solopreneurs and lean teams who want less chaos and more clarity.
🔐 100% privacy. No noise. Just practical system design ideas you can implement this week.
🧠 Nerd Verdict
If your service business feels heavy, onboarding is usually the quiet culprit. It’s where expectations drift, where tasks fall through the cracks, and where your future workload is either streamlined or sabotaged.
By mapping your five core stages, defining a standard intake package, building a task activation layer, and wiring a simple 7-email sequence, you create an onboarding engine that doesn’t depend on your memory or mood. You also create a better experience for the people who pay you.
From there, layering in no-code and automation tools is straightforward. You can follow implementation-focused guides like Automating Client Onboarding Without Coding to connect the wires, knowing your underlying blueprint is solid.
In other words: don’t start with the app. Start with the map.
❓ FAQ: Nerds Ask, We Answer
💬 Would You Bite?
If you looked at your current onboarding today, which stage would scare you the most to show a client—intake, access, or communication?
And what’s the smallest change you can make this week to move it one step closer to a clean, repeatable system? 👇
Crafted by NerdChips for creators and teams who want their best ideas to travel the world.

