-This post may contain affiliate links. If you click on one and make a purchase, I may earn a small commission at no extra cost to you.-
📷 Introduction: The Best Camera Is the One in Your Pocket
Smartphone cameras have come a long way. What used to be a backup for “real photography” is now a primary tool for content creators, digital nomads, and even professionals.
But here’s the truth: it’s not just about megapixels. It’s about knowing how to use your phone’s camera like a pro—from understanding light and composition to using manual controls and editing apps that make your shots stand out.
Whether you’re a freelance content creator, a lifestyle blogger, or just someone who wants to stop taking blurry travel photos—this guide will help you unlock the real power of your smartphone camera.
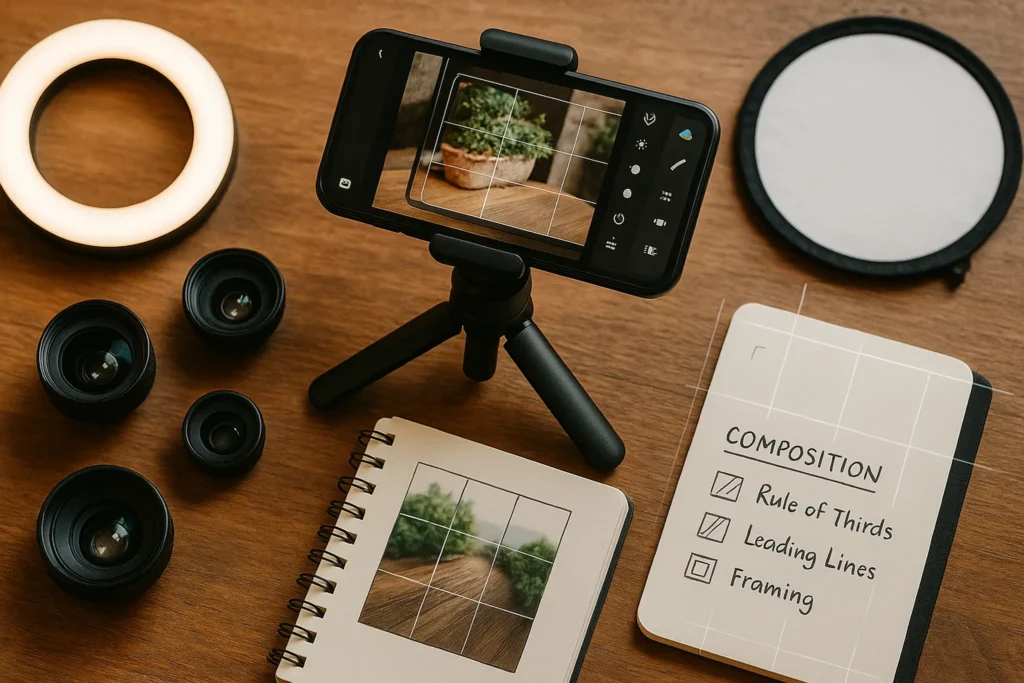
🎯 1. Composition Is King – And the Grid Is Your Best Friend
Even the most expensive camera won’t save a poorly composed shot. Start by turning on grid lines in your camera settings. This activates the Rule of Thirds, a timeless photography principle that places key elements along imaginary thirds of the frame.
Quick Wins:
-
Place the subject off-center, not dead center
-
Use natural frames like windows or doorways
-
Leave breathing room around the subject
-
Leading lines (like roads or fences) help draw attention
🧠 Nerd Tip: If your app supports focus lock and exposure lock, use them to avoid accidental shifts while recomposing.
💡 2. Light Is Everything: Learn to See It, Shape It, Control It
Lighting makes or breaks a photo. Your smartphone sensor struggles in low light, so learn how to use light intentionally.
Natural Light Tricks:
-
Golden Hour (1 hour after sunrise or before sunset) gives soft, flattering tones
-
Use window light for indoor portraits—avoid overhead lighting
-
Backlighting adds depth but needs exposure correction
Control Exposure:
-
Tap on the screen to focus
-
Swipe up/down to manually adjust exposure level
-
In pro modes, tweak ISO, white balance, and shutter speed
📱 Nerd Tip: Apps like Halide (iOS) or ProShot (Android) unlock full manual controls and even RAW shooting.
🧳 Use Case Layering: Smart Photography for Different Lifestyles
🧑💼 Content Creator / Freelancer
-
Scenario: Shooting product photos, headshots, or workspace B-roll
-
Setup: Use ring light, phone tripod, HDR smart mode
-
Tools: Lightroom Mobile, Snapseed, Lensa AI
-
Bonus: Combine with New Productivity Apps Worth Trying to manage your creative workflow on the go
🌍 Travel Enthusiast / Nomad
-
Scenario: Landscape and city shots on the move
-
Tactics: Use panorama mode, burst mode for action
-
Gear: Clip-on wide-angle or ND filter lenses
-
Tip: Always clean your lens—travel dirt kills clarity!
📷 Lifestyle Blogger / Instagrammer
-
Scenario: Outfit shots, food photos, daily vlogs
-
Tricks: Use portrait mode + grid + natural lighting
-
Add-ons: Selfie light clip, wireless shutter remote
-
App Picks: VSCO for filters, Tezza for styling
🎛️ 3. Don’t Fear Manual Settings — They Give You Creative Control
Most phone cameras use auto-mode, but manual settings (a.k.a. “Pro Mode”) unlock a whole new world—especially for creative shots.
Here’s what each setting really does (and when to use it):
| Setting | What It Does | Use Case |
|---|---|---|
| ISO | Brightens the image, but too much = grain | Low ISO (100–200) in daylight, High ISO (800+) only in dark scenes |
| Shutter Speed | Controls motion blur | Slow (1/4s) for night light trails, Fast (1/1000s) for action |
| White Balance | Corrects color temperature | Use “Daylight” or “Shade” depending on scene |
| Focus | Sets sharpness manually | For macro shots or precise depth control |
💡 Nerd Tip: Use a tripod and timer for long exposure shots (e.g., waterfalls, city light trails).
📱 Recommended App: Manual Camera DSLR (Android) or Halide (iOS) for full manual shooting.
🌈 4. RAW vs JPEG: Choose the Right Format for the Job
Most phones shoot JPEGs by default. They’re compressed, smaller, and look “finished.” But if you’re serious about photography, shooting RAW gives you much more editing power.
JPEG
✅ Small file
✅ Automatically processed
❌ Limited editing flexibility
RAW
✅ Retains full image data
✅ Best for pro editing in Lightroom or Snapseed
❌ Larger file size
❌ Requires editing skills
When to Use RAW:
-
Low-light scenes
-
High dynamic range (sunset/sunrise)
-
Professional editing needs
🧠 Nerd Tip: Apps like Adobe Lightroom Mobile or Darkroom (iOS) can handle RAW editing on mobile directly.
🛠️ 5. Best Mobile Photo Editing Apps (Free & Paid)
Once you’ve shot a solid photo, editing is where the magic happens. These apps are must-haves for any smartphone photographer:
| App | Best For | Notes |
|---|---|---|
| Snapseed | Full control, RAW support | Free, great for selective edits |
| Lightroom Mobile | Pro-level editing, presets | Free + premium features |
| VSCO | Stylish filters, quick edits | Trendy but subtle styles |
| Tezza | Lifestyle edits, overlays | Great for bloggers & IG creators |
| Lensa AI | AI portraits, clean-ups | Good for face-focused content |
💡 Nerd Tip: Always adjust exposure and contrast before applying filters. Start with clean edits, not just “Instagram vibes.”
🧩 Bonus: Smart HDR, Focus Lock, and Burst Mode – Hidden Gems
Smartphones have features most people never use—but pros rely on them every day.
📸 Smart HDR (High Dynamic Range)
HDR blends multiple exposures to create a balanced photo.
✅ Use for: Landscapes, sunsets, scenes with both bright & dark elements
❌ Don’t use for: Fast-moving subjects (can create ghosting)
🔒 Focus Lock + Exposure Lock
Tap and hold on the screen → Lock both for consistent control.
Use this when:
-
Shooting portraits with movement
-
Composing tricky lighting scenes
-
You don’t want the camera auto-adjusting mid-shot
💥 Bonus Tip: Combine this with manual exposure adjustments to balance harsh sunlight or indoor lighting.
🔁 Burst Mode
Hold down the shutter → Capture 10+ photos per second.
Great for:
-
Action shots (kids, pets, sports)
-
Jump shots or motion experiments
-
Choosing the best expression from a selfie group
🎒 Ready to take your mobile photography even further?
While mastering techniques like lighting and composition is essential, having the right gear can seriously elevate your content quality. From wireless mics to stabilizers and clip-on lenses, there are tools that make shooting faster, easier, and more professional—especially if you’re creating content for platforms like YouTube, TikTok, or Instagram.
👉 Check out our curated list of the Best Smartphone Accessories for Content Creators to upgrade your mobile shooting kit today.
🛒 Gear Matters: Budget Accessories That Elevate Mobile Photography
You don’t need to spend thousands—but a few smart accessories will dramatically improve quality.
| Accessory | Why It Helps | Price Range |
|---|---|---|
| Phone tripod | Stability = sharper images | $10–$25 |
| Bluetooth shutter remote | Hands-free shooting | $5–$15 |
| LED ring or panel light | Better indoor lighting | $20–$50 |
| Lens clip-ons | Wide, macro, tele options | $15–$50 |
| Cleaning kit | Crystal-clear lens | $5–$10 |
| Softbox diffuser | Softens harsh light | $10–$30 |
🧠 These tools are especially useful for digital nomads or lifestyle bloggers working on the move.
Here’s how a smart workflow looks like for fast content production:
-
Shoot in Pro Mode + RAW
→ Better detail, more editing control -
Initial Review
→ Use your gallery to favorite 2–3 shots -
Import into Snapseed or Lightroom
→ Crop + adjust exposure/contrast first -
Color Grade + Retouch
→ Use filters, but subtly -
Export in High-Res
→ Upload directly or save to Drive/Cloud
💬 Tip: Want even better results? Use your favorite from the [New Productivity Apps Worth Trying] post to schedule, caption, and post your content seamlessly across platforms.
💻 How Creators Combine Phones + Cameras (Hybrid Workflow)
Some creators shoot 70% with smartphones, 30% with DSLR or mirrorless for certain use cases. Here’s a smart way to combine both worlds:
Smartphone for:
-
Daily content
-
Short videos, BTS, Reels
-
Travel vlogs
-
Overhead desk shots (via arm mount)
DSLR/Mirrorless for:
-
Depth-rich B-roll
-
Product close-ups
-
Low-light events
-
Interviews or paid shoots
🔁 Combine them using apps like Frame.io, Adobe CC Cloud, or even Google Drive to sync and manage footage in one place
🪄 Mini Comparison: Smartphone vs DSLR/Mirrorless – When Does It Matter?
Smartphones have closed the gap—but not entirely. Here’s a fair snapshot of where each shines:
| Scenario | Smartphone Wins | DSLR/Mirrorless Wins |
|---|---|---|
| Everyday content | ✅ Fast, shareable, pocket-sized | ❌ Overkill |
| Portraits & product | ✅ Good with portrait mode | ✅ True bokeh, lens quality |
| Low light & night | ❌ Noisy, limited sensor | ✅ Larger sensor, cleaner results |
| Manual control | ⚠️ Limited unless using apps | ✅ Full control built-in |
| Travel | ✅ Lightweight | ❌ Heavy gear to carry |
| Pro-level commercial | ❌ Not there yet | ✅ Industry standard |
📌 Verdict: Use your smartphone for 80% of content, but know when a real camera still makes a difference—especially for client work or print-quality projects.
🧠 Nerd Verdict: Your Smartphone Camera Is More Powerful Than You Think
In our tests—and from countless use cases by creators—the smartphone wins on convenience and speed. But what makes it a serious tool for photographers is not the hardware… it’s how you use it.
If you:
-
Understand light
-
Compose your shots intentionally
-
Take control with manual settings when needed
-
And edit smartly…
You can create portfolio-level photography—without ever touching a DSLR.
Smartphone photography is no longer a compromise. It’s a creative force, especially when paired with the right apps and a clear eye for storytelling.
❓ FAQ: Nerds Ask, We Answer
Q: Are external lenses worth it for smartphones?
Yes—especially wide-angle or macro lenses. Brands like Moment and Apexel offer quality lens attachments that expand creative options.
Q: Can I shoot in RAW with any phone?
Not all phones support it natively, but third-party apps like Halide, ProShot, or Manual can enable RAW shooting on most modern phones.
Q: What’s better: native camera app or a manual control app?
Use native apps for quick social content. Switch to pro/manual apps when you want full control or plan to edit in detail later.
Q: Should I invest in a phone tripod?
Absolutely. It improves stability, unlocks long-exposure shots, and gives you freedom for timed or remote photography.
💬 Would You Bite?
What’s the most powerful smartphone photo you’ve ever taken?
Share your best mobile shots—or the one that surprised you the most—and tell us what you used to get it just right. Let’s trade tips in the comments! 📸👇