🌈 Intro
The first thing viewers judge—long before your mic or overlay—is your light. If your face is muddy and the background is flat, the stream feels amateur no matter how clever the gameplay or commentary. The flip side is powerful: with smart RGB and camera-aware lighting, the same webcam suddenly looks expensive, your brand shows up in color, and your scenes feel alive. The 2025 ecosystem is finally good enough that you can trigger lighting on scene change, react to game events, and even pulse your room when donations hit—all without wrestling with a stage rig.
This guide is the practical playbook NerdChips gives creators when they want that “studio” vibe without renting one. We’ll break down why lighting matters, how to build scene-based RGB, what camera sync really means (and how to avoid flicker or color drift), and which tools are worth your money at budget, mid-range, and high-end tiers. We’ll finish with tested recipes that map lighting to your OBS scenes, plus fixes for lag, banding, and over-saturation.
If you’re building the whole on-screen look, pair this with our Stream Overlay Packs and grab quick wins from DIY Lighting Hacks for Professional Looking Videos. Creators on tight budgets can stitch together a complete rig with tips from Video Equipment on a Budget, and if you plan to turn clips into Shorts, see Best AI Video Editing Tools Reviewed for fast captions and reframes. Lighting is the multiplier—let’s make it work for you.
💡 Nerd Tip: Before buying anything, write one sentence per scene about how it should feel (cozy chat, neon cyberpunk, clean neutral). Gear is easy to pick once mood is precise.
🌟 Why Lighting Matters for Streamers
Lighting does three jobs at once: it raises image quality, builds brand, and drives engagement. In terms of pure image quality, a consistent key light lets you drop ISO, which reduces noise and lets your camera’s sharpening look natural instead of crunchy. Even with a mainstream webcam, a decent key at the right angle (30–45° off axis, slightly above eye level) produces dimensionality—cheekbones pop, eyes catch light, and your room reads as a real space rather than a flat wall.
From a brand perspective, color is identity. Your avatar, panels, and overlays carry a palette—why shouldn’t your room? When the background is tinted with your brand colors in a subtle gradient, viewers can recognize your content in a split second while scrolling. It also gives you storytelling control: warm amber tells the audience, “We’re hanging out”; cyan/magenta says, “We’re in action mode.” That’s narrative design with LEDs.
Finally, engagement. When the lights react to the stream—alerts, subs, clutch plays—viewers get feedback loops that feel tactile. A soft pulse on a donation or a brief strobe on a raid acts like an on-screen confetti burst for the room. Done tastefully, this cues celebration without blowing out your camera. The trick is restraint and calibration, which we’ll cover in the recipes.
💡 Nerd Tip: If your camera looks soft, try fixing light placement before upgrading the body. A $100 panel placed well beats an expensive camera in bad light.
🌈 Scene-Based RGB Lighting (Make Your Stream Feel Designed)
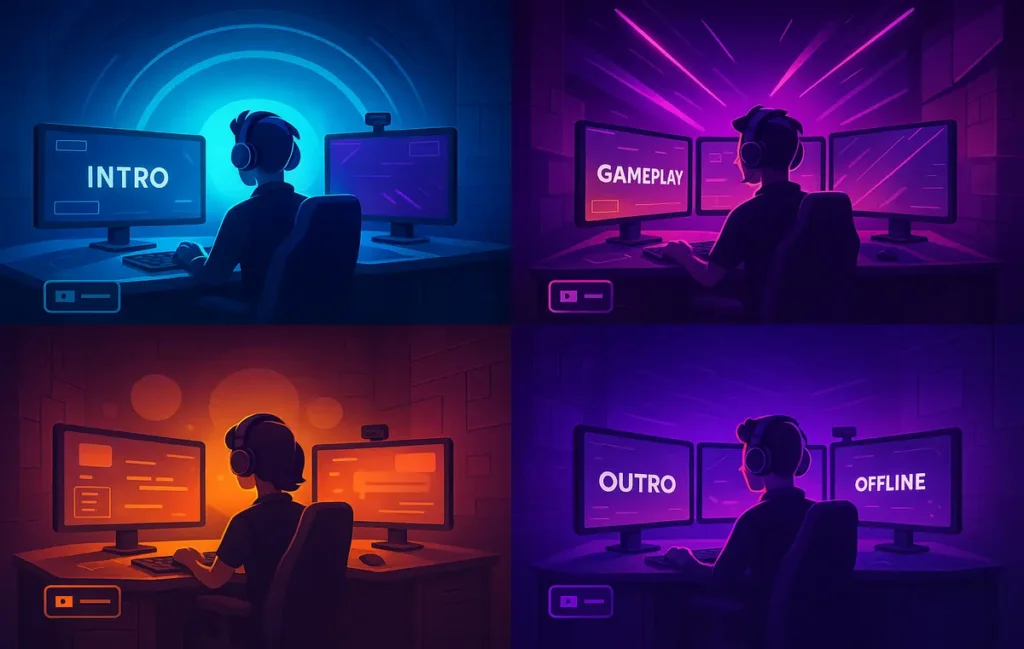
Think of scenes as rooms within your show. Each room deserves a lighting design that matches intent, rather than leaving one RGB preset on all night. At minimum, streamers benefit from four distinct scenes:
Intro/Starting: Slightly elevated saturation, gentle motion (a slow hue shift or soft “breathing” pulse). You’re signaling “showtime” without overwhelming pupils coming from a bright loading screen. Keep key light at broadcast-neutral (around 5000–5600K) so skin tone stays correct while the background does the dancing.
Gameplay: RGB reacts to content. If your game is dark and high-contrast, tilt the background toward deep blues or desaturated magentas to retain separation without adding noise to the shadows. For bright, colorful titles, let lighting adopt a complementary tone (e.g., cool cyan behind a warm desert environment). Software like Govee Desktop or Philips Hue Sync can mirror dominant screen colors in real time, but don’t let them drive your key—keep the face stable.
Just Chatting: Viewers are here for you. Dial saturation down and color temperature warmer (around 4200–4800K) to feel relaxing and intimate. This is where vertical light strips or Nanoleaf panels behind you can add soft gradient interest without stealing attention. A subtle vignette—two dim RGB bars aimed at the wall behind you—creates depth on cheap walls.
BRB/Outro: More stylized palette, lower key, and a distinct motion effect (e.g., a slow sweep or sparkle) to signal a mode change. The scene should look different enough that no one confuses it with “live” at a glance.
On the software side, you’ll wire these looks to OBS or Stream Deck so lighting flips automatically when scenes change. Most ecosystems offer APIs or plugins; if yours doesn’t, simple bridges (like IFTTT or webhooks) can receive an OBS scene-change event and trigger a new preset. The point is non-negotiable: your hands should stay on WASD or the mic, not on a phone app hunting for a color wheel.
💡 Nerd Tip: Give each scene its own exposure target, not just color. A softer key in “Just Chatting” keeps skin from looking clinical; a slightly brighter key in “Gameplay” reduces the perceived noise when your game window dims.
🎥 Camera Sync & Dynamic Effects (No Flicker, No Banding, All Vibe)
“Camera sync” lives in two layers. The first is electrical compatibility so your light and camera don’t fight; the second is creative responsiveness so the light enhances content rather than distracting from it.
On the electrical side, some LED systems use PWM dimming at frequencies that can cause banding or flicker at certain shutter speeds. If you notice odd bands rolling through your image, lock your shutter to your region’s mains (1/50 or 1/100 for 50Hz; 1/60 or 1/120 for 60Hz) and nudge your dimmer one or two percent. Quality fixtures (e.g., Elgato Key Light) are designed for camera use at common shutters, which is why “panel for streamers” matters. Cheaper RGB can still work—just test at your intended frame rate and shutter and commit those settings as a preset.
On the creative side, “sync” means your lighting reacts intelligently. Philips Hue Play Bars with a Hue Sync setup can mirror dominant color zones from your gameplay; Govee panels and bars offer similar mirroring through desktop capture. Keep mirroring to the background zones, and let your face stay constant—otherwise skin tone swings from green to blue as the game changes, and viewers subconsciously feel seasick. Want true dynamism? Route alerts from your streaming platform to an API that flashes a tasteful animation—one-second confetti, two pulses for a sub, a brief color cycle on a raid.
Integrations are where the rig becomes “one brain.” Elgato Key Light pairs with Stream Deck to punch the key up 10% when you switch to “Gameplay,” then down when you hit “Just Chatting.” Nanoleaf scenes can be bound to keys so your “Intro” literally loads a pattern named “Stage Warm.” With a couple of bridge automations, you can have OBS tell your lights: “Scene changed—go to Program A.”
💡 Nerd Tip: Set white balance manual once per scene. Auto WB will chase RGB changes and ruin consistency. Lock it, then make lights obey you.
🧰 Recommended Tools (2025) — Budget to Flagship
Budget You’ll Actually Use
Govee RGB Light Bars / Panels.
Affordable, bright enough for background work, and excellent software for screen mirroring. The newer desktop app is light on CPU, and the ecosystem includes bulbs, bars, and strips that share scenes. Use these for background mood and alert reactions. For donations or raids, trigger a quick rainbow sweep; for gameplay, let the back wall reflect dominant hues.
Neewer LED Panels (bi-color).
Basic but consistent key/fill. With diffusion, these give you soft, controllable light for your face. They don’t have deep app ecosystems, but they hold flicker-safe output at common streaming shutters. Mount one at 45° and one low-level fill opposite; you’ll look like you upgraded your camera.
Mid-Range Sweet Spot
Elgato Key Light / Key Light Air.
Purpose-built for streamers: high CRI, flicker-safe, app + Stream Deck control, slim profile. The Air variant fits desks with less vertical space. The win here is workflow—dimming, CCT, and on/off are single taps, so you actually adjust during stream rather than “set and forget.”
Nanoleaf Shapes / Lines.
These are installations as much as lights. Scenes look great on camera, the diffusion is eye-friendly, and the layout becomes part of your set design. For “Just Chatting,” Nanoleaf brings texture that says “studio,” even if it’s a bedroom wall.
High-End / Ecosystem Play
Philips Hue Play + Hue Sync (with Sync Box or desktop).
The Hue ecosystem is robust—scenes, zones, schedules—and the Play Bars deliver precise, smooth gradients against walls. Mirroring through a hardware Sync Box or desktop client keeps latency low and color shifts tasteful. If you’re going all-in, build zones: key neutral (not Hue), bias lights behind monitor, and background gradient on walls. You pay more, but you get coordination and reliability.
💡 Nerd Tip: Separate face light from fun light. Put your key/fill on studio panels (Elgato/Neewer) and keep RGB for background and accents. You’ll preserve skin tone while the room dances.
⚡ Upgrade Your Stream’s Look in One Weekend
Start with a reliable key (Elgato Key Light or a diffused Neewer), add Govee or Nanoleaf for background mood, and wire scene-based presets to your Stream Deck or OBS.
🧭 Step-by-Step Setup (From Blank Desk to Pro Scenes)
1) Lock camera fundamentals.
Set base frame rate (30 or 60), shutter (1/60 or 1/120 for 60Hz regions, 1/50 or 1/100 for 50Hz), and manual white balance for your primary scene. Lower ISO by adding light rather than cranking gain. This is the foundation; treat it like setting a guitar’s tuning.
2) Place your key.
Left or right of lens at 30–45°, a little above eye-line, tilted down. Diffuse until shadows are soft but still present. If you wear glasses, raise the key and move it laterally to avoid reflections; sometimes shifting to a softer, larger source eliminates glare entirely.
3) Add background depth.
Two RGB bars aimed at the wall behind you at low intensity carve separation. Add a bias light strip behind your monitor to reduce eye strain and make the overall image feel more polished. Keep saturation modest; the camera sees color before we feel it, so small dB in RGB goes a long way on sensor.
4) Wire scenes to control.
Create four lighting presets (Intro, Gameplay, Chat, Outro) in your RGB ecosystem and name them clearly. In Stream Deck or OBS, bind scene changes to lighting presets through native plugins or webhooks. If your ecosystem doesn’t have a plugin, run a tiny local script that calls the API when OBS emits a scene-change event.
5) Add reactive moments.
Connect your alert system (e.g., StreamElements/Streamlabs) to your lights through an event webhook. Donation → 1.0-second celebration pattern; Sub → two pulses; Raid → color cycle capped at two seconds. Test at low brightness first—avoid blowing out exposure during the celebration.
6) Calibrate and record test clips.
Do a one-minute run-through of each scene. Check for flicker, color shifts, and hot spots. If your skin goes green during Gameplay, your mirroring is touching the key; decouple them. Lock white balance per scene and re-save presets so you can rebuild quickly after updates.
💡 Nerd Tip: Give your “panic button” a Stream Deck key that resets lights to neutral key + low RGB. If software crashes mid-stream, you won’t be stuck in a rave.
🎛️ Color, Calibration & Consistency (The Invisible Polishing Pass)
Color is emotional, but calibration is technical. Start by choosing a reference white for your key—5000–5600K tends to read “professional” on camera while still flattering skin. If you prefer warmer “podcast” vibes, 4200–4800K works well, but keep it consistent within a scene. Use a cheap gray card or even a white printer sheet to set WB once, then switch to manual so auto algorithms don’t chase your RGB.
For exposure, target a soft highlight on the forehead and cheekbones without clipping. In histograms, that’s mid-to-high mids. If you’re consistently shiny, it’s a diffusion or angle issue more than makeup—move the key slightly off axis and lower intensity rather than stacking software filters. For backgrounds, aim RGB at walls to let diffusion happen naturally; direct LEDs to lens can cause bokeh “glitter” that looks chaotic on compression.
Lastly, set a house style: one accent color per scene, a secondary for subtle gradients, and a rule like “no saturated green on skin.” This branding discipline makes thumbnails and VODs look consistent, which matters for recognition.
💡 Nerd Tip: If your room has colored walls, own it—pick RGB that complements that base color instead of fighting it. Fighting creates muddy browns; complementing creates cinematic depth.
🔌 Integrations That Make It Feel Magic
Stream Deck + Elgato Key Light.
One-tap control of intensity and color temp changes how often you fix your light mid-stream—because it’s effortless. Create multi-actions that switch OBS scene and adjust key by ±10%.
OBS WebSocket + RGB Ecosystems.
Most RGB brands expose APIs. Use OBS WebSocket events to call lighting changes programmatically so you never forget to switch the vibe. If coding isn’t your jam, lightweight bridges (Home Assistant, IFTTT) can listen and translate.
Alert Webhooks.
Route “subscribe” and “donation” events to a small automation that triggers an RGB scene for <2 seconds. Keep durations short; you want a celebration, not a seizure warning.
Post-production.
If you clip highlights for social, keep lighting stable in “Chat” segments so AI editors cut cleanly. You can punch saturation in post; it’s harder to fix skin tone that shifted blue/green. See Best AI Video Editing Tools Reviewed for captioning and reframing that respects your palette.
💡 Nerd Tip: Name presets with human language: Chat | Warm Cozy, Gameplay | Mirror Cool, Intro | Pulse. Future you will find and reuse them faster.
🧱 Challenges & Fixes (What Trips Streamers Up)
Sync Lag.
Software screen mirroring can lag if your CPU or GPU is slammed. Route mirroring to background zones only and reduce sampling regions. Hardware capture (e.g., Hue Sync Box) can feel snappier. If you still see delay, ditch mirroring during competitive matches and use scene-bound static looks instead.
Over-saturation.
It’s tempting to crank RGB until the room looks like a nightclub. Cameras clip channels far sooner than your eyes. Dial saturation down 15–25% from what “looks right” in person and check the monitor—your audience watches the camera, not your wall.
Flicker/Banding.
Match shutter to mains frequency and bump dimmer by small increments (1–3%). If a specific fixture is the culprit, move it to the background where flicker reads as texture rather than on skin.
Limited Budget.
Start with a good key and a single pair of RGB bars. You can fake soft hair light by bouncing a cheap bulb off the ceiling or a poster board. Video Equipment on a Budget shows exactly how to build this without debt.
Small Rooms.
Space is a feature. Bounce RGB off walls for wider diffusion, mount key lights vertically to save desk space, and use corner strips to build gradients. Smart placement beats bigger rooms.
💡 Nerd Tip: Record 20 seconds of silence in each scene. AI noise reduction loves consistency, and you’ll catch hums or coil whine you’d never hear while talking.
🧪 Mini Comparison
| Ecosystem | Best Use | Why Pick It | Watch-outs |
|---|---|---|---|
| Elgato Key Light (+Stream Deck) | Flawless face light | Camera-safe dimming, instant control | Pricier than generic panels |
| Nanoleaf Shapes/Lines | Set design & texture | Looks premium on camera | Adhesive planning matters |
| Govee Bars/Panels | Budget RGB + mirroring | Strong software, great value | App quirks across product generations |
| Philips Hue Play + Sync | Polished gradients & low-lag mirroring | Mature ecosystem, granular zones | Higher cost, hub required |
📬 Want More Stream-Ready Build Guides?
Join our free newsletter for scene recipes, OBS automations, and gear stacks that actually ship—curated by NerdChips for creators who hate guesswork.
🔐 100% privacy. No noise. Just practical, repeatable systems.
🧠 Nerd Verdict
Smart lighting isn’t decoration—it’s direction. The combination of a stable, flattering key and scene-based RGB is the fastest path to professional presence, even with a modest camera. When you let OBS drive lights, the stream feels produced rather than improvised; when alerts nudge color briefly, the room participates without stealing the show. In 2025, the ecosystem is mature: Govee for wallet-wise mirroring, Nanoleaf for set design, Elgato for camera-safe face light, Philips Hue for polished gradients. Pick the pieces that fit your narrative, wire them to your scenes, and your viewers will feel the upgrade before you finish your first sentence.
❓ FAQ: Nerds Ask, We Answer
💬 Would You Bite?
If you had to build a smart lighting rig this weekend, would you go Elgato + Stream Deck for iron-clad control, or Govee + OBS plugins for budget RGB that still reacts to gameplay?
Crafted by NerdChips for creators and teams who want their best ideas to travel the world.