A quick lighting macro for webcam calls is a fixed 60-second routine you repeat before every call: set soft light at 45°, frame your face with minimal headroom, fix skin tone and glare, and reset your expression. When this becomes muscle memory, you look “studio-ready” on Zoom without thinking.
🎥 Intro
If you’re hopping between calls all day, you don’t have time to rebuild your webcam setup from zero every single time. You open Zoom, see your own grainy, shadowy face in the corner, promise yourself you’ll “fix this later,” and then jump straight into the meeting. By the third call, you feel tired, washed out, and vaguely annoyed at your own video feed.
The truth is, most people don’t need more gear. They need a repeatable sequence. A quick lighting macro for webcam calls is a tiny ritual that takes about 60 seconds and removes the guesswork from looking good on camera. You don’t experiment. You don’t tweak for ten minutes. You just run the same steps in the same order and let the system handle the quality.
On NerdChips we talk a lot about reducing friction in digital workflows, whether it’s running better virtual meetings or turning an old phone into a shockingly good webcam. This macro follows the same philosophy: your on-camera presence should be upgraded by a system, not by your willpower on a bad day.
💡 Nerd Tip: If you design your 60-second macro properly once, it keeps paying you back for hundreds of calls—interviews, client meetings, livestreams, and workshops.
In this guide, we’ll build that macro together: 20 seconds for lighting, 20 seconds for framing, 10 seconds for color and clarity, and 10 seconds for presence. By the end, you’ll have a short sequence you can memorize and run on autopilot.
⚡ The Concept of a “Camera-Ready Macro” (Why It Works)
A macro is just a fixed sequence of actions you run the same way every time. In software, you might trigger a macro to automate repetitive clicks. In your video setup, a camera-ready macro is the analog version: one tiny routine that brings your face, light, and framing into a consistent “good enough” zone without thought.
The magic here is that your brain loves consistency. Every time you improvise your setup, you burn mental energy deciding whether the lamp looks okay or if the background is too cluttered. That’s cognitive load you could be using for the actual conversation. When you have a macro, you step through it in the same order, and your brain relaxes because it knows exactly what comes next.
From a visual perspective, macros create a personal standard. Your viewers—clients, colleagues, or audience—see roughly the same shot every time: clear eyes, flattering angle, neutral background, natural skin tone. You become “the person who always looks prepared,” even when you just sprinted from making coffee to your desk. Over time, that consistency compounds just like consistent sound and editing does for creators who follow serious video editing pro tips.
There’s also a psychological benefit. When you feel camera-ready, you show up differently. Your posture improves, you speak with more confidence, and you stop obsessing about how you look. Remote workers who make a small “call ritual” like this often report they feel less drained after a day of meetings, not because the calls changed, but because they stopped fighting their setup.
💡 Nerd Tip: Treat your camera-ready macro like brushing your teeth—boring, repeatable, and non-negotiable. You don’t debate it; you just run it.
🔦 Step 1 — The 20-Second Lighting Fix (Instant Glow Formula)
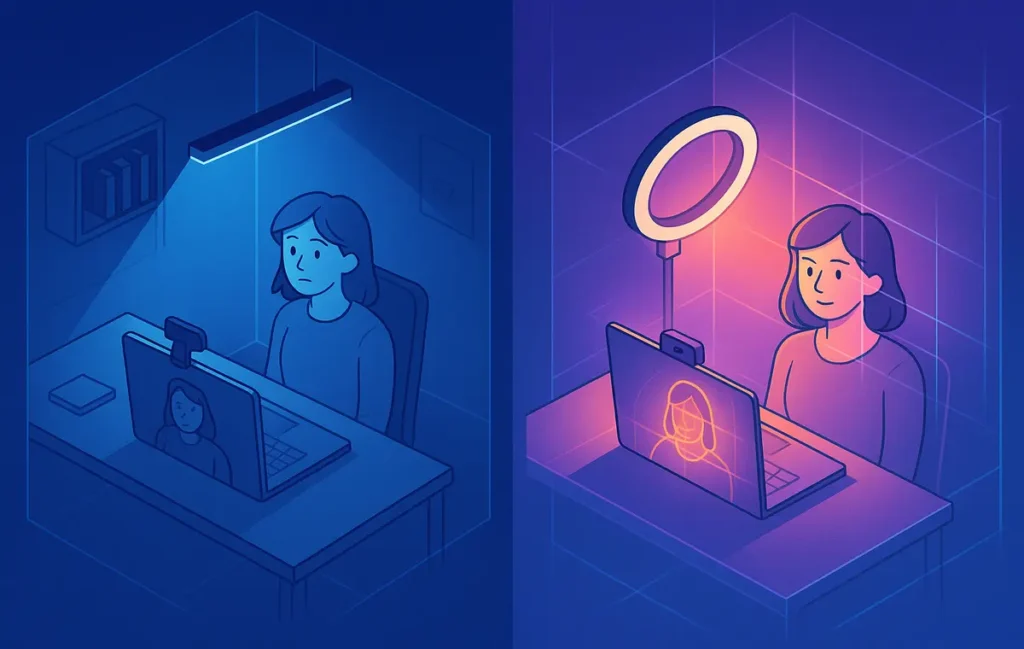
Lighting is the single biggest upgrade you can make to your webcam image. Many people assume they need a ring light or studio panel, but you can make a huge difference with a simple desk lamp or even your monitor—if you place and use it correctly. The quick lighting macro for webcam calls focuses on direction, height, softness, and consistency.
First, direction. Instead of putting light directly in front of you or above you, aim for roughly a 45° angle to one side of your face. Imagine a clock on your desk: if your nose points at 12, your light should roughly sit at 10 or 2. This angle creates gentle shadow on one side of your face, which adds shape and avoids the flat, “passport photo” look. Straight-on light tends to make you look tired and washed out; an off-axis light adds subtle definition without feeling dramatic.
Next, height. The light should sit slightly above your eye line—think “eye level plus a hand span” or around 10 centimeters. When light comes from below, it creates horror-movie shadows. When it comes from too high, your eyes sink into shadow. A slightly elevated position mimics natural window light and gives a soft highlight to your eyes.
Softness matters more than brightness. You want broad, diffused light, not a harsh point. If you’re using a desk lamp, bounce it off a wall or through a thin white cloth or paper to spread the glow. If you’re in a hurry, an old trick is to use your monitor as a fill light: open a blank document or light-colored web page and reduce brightness until your face looks even without blinding you.
Finally, keep your environment predictable. Turn off flickery overhead lights and avoid mixing several different color temperatures. Your brain doesn’t have time to recalibrate every call. If you have smart bulbs or RGB panels, you can build on the ideas we cover in smarter setups like scene-based lighting for streamers, but for now, a single soft light at 45° will already feel like a level-up.
💡 Nerd Tip: When you sit down, don’t ask, “Does my light look okay?” Ask, “Is my light at 45° and just above my eyes?” Checking position is faster than judging vibes.
🖼️ Step 2 — The 20-Second Framing Fix (Auto-Professional Look)
Once your light is in place, framing decides whether you look like you’re leading the meeting or peeking over a wall. The goal is a shot that feels intentional and calm, not like whatever your laptop camera randomly captured when you opened the call.
Start with distance. For most laptop and webcam lenses, sitting about 50–70 centimeters from the camera (roughly an arm’s length to arm-and-a-half) gives a natural medium shot. Your head and upper shoulders are in frame, your hands occasionally appear when you gesture, and the background doesn’t dominate. Too close and your nose gets all the attention; too far and you feel detached.
Then look at headroom. You want a small slice of space between the top of your head and the top of the frame—often called “Hollywood framing.” Most people accidentally leave a huge gap, which makes them seem smaller and less grounded. Adjust your chair, laptop stand, or tripod so your eyes land roughly on the top third line of the frame, like using the rule of thirds in photography. This instantly looks more professional, and it’s something even livestream pros optimize when they design scenes with production tools built for creators.
Camera height is non-negotiable. Your camera should be at eye level or slightly above, never below. A low camera angle points up your nose and exaggerates your jawline in unflattering ways. A slightly high camera angle is forgiving, especially on long days. If you don’t have a fancy arm, a stack of books under the laptop or a budget stand does the job.
Finally, consider background depth and angle. Turn your shoulders about 15° instead of facing the camera perfectly straight. This “cinematic stance” creates a hint of depth and puts one shoulder closer to the lens, which feels more natural. If possible, avoid sitting directly against a wall; even 50 centimeters of distance can soften the background and reduce shadows.
💡 Nerd Tip: Before every call, look at your preview and mentally ask three things: “Is my camera at eye level? Is my head near the top third? Do I have a little background depth?” If yes, you’re framed.
🎧 Step 3 — The 10-Second Color & Clarity Check
With light and framing handled, your next job is to make sure your image doesn’t look sickly or muddy. This is where a quick color and clarity check comes in. You’re not trying to color-grade a movie—just nudging your skin tone and sharpness into a natural zone.
First, check skin tone. If your face looks too yellow or green, your light temperature or screen color is off. Use your app’s built-in adjustments, if available, to nudge warmth and tint until your skin looks like it does in real life under neutral daylight. You want a healthy, subtle warmth, not an orange filter. On many platforms, a tiny adjustment goes a long way, and you can save it as default so this step becomes mostly a glance.
Clarity is about sharpness and contrast. Some apps include a light “touch up” or detail slider. Use it sparingly: aim for a soft, clean look where your eyes and facial features are clear, but you don’t look hyper-sharpened. A tiny bump in contrast can help your face stand out from the background, especially if you’re working with a basic laptop webcam and no dedicated camera like the ones we often recommend for more serious creators.
If you wear glasses, spend two of your ten seconds on glare. Slightly tilt the frames down or adjust your light angle higher so the reflection moves out of the lens area. Many people don’t realize that a tiny change in head angle or light height can remove lens flare entirely. NerdChips readers who implement this consistently often say it’s the single tweak that made them feel “less self-conscious” on camera.
Finally, give your lens a quick wipe. A microfiber cloth or even a clean cotton t-shirt is better than nothing. A smudged lens softens contrast in a way that no software slider can fix. It’s the webcam version of wiping your phone camera before taking a photo—small habit, huge reward.
💡 Nerd Tip: Build a 3-second mantra: “Tone, glare, lens.” If those three look good, you’re already ahead of most people on your next call.
🎯 Step 4 — The 10-Second Expression + Presence Macro
The best lighting and framing in the world can’t fix a tired, unfocused expression. The last 10 seconds of your macro are about presence: how you show up in the first few moments when everyone silently judges whether you seem engaged or exhausted.
Start with a micro-smile. Not a big grin, just a gentle upward curve at the corners of your mouth that softens your face. This automatically brightens your eyes and makes you look more approachable. People instinctively trust faces that look calm and open, especially in digital environments where body language is limited.
Then, soften your eyes. Instead of staring at yourself in the preview window, look directly at the camera for a couple of seconds. Imagine you’re greeting one specific person you like working with. This tiny mental shift changes the way your eyes read on camera, making you seem more present even before you say anything.
Next, take one slow inhale and exhale. This resets your nervous system, drops some of the tension in your shoulders, and helps you sound less rushed when you start talking. Creators who stream regularly—and who also obsess over scene lighting and webcam angles in setups like smart RGB lighting for streamers—often have a similar “pre-live” breath they take before going on air.
If you can, drop your chin a tiny bit so you’re not accidentally looking down at everyone or craning your neck upward. A slight chin-down angle can help reduce the appearance of fatigue around the jawline and under the eyes while maintaining eye contact with the camera.
💡 Nerd Tip: Think of this as your “host mode” switch. Light and framing make you visible; expression makes you memorable.
⚡ Download Your 60-Second Camera-Ready Macro Card
Turn this routine into a habit with a printable checklist and desktop widget. Keep the macro one glance away so every call starts with “studio-ready,” not “sorry about my camera.”
🧩 The Complete 60-Second Macro (Easy to Memorize)
At this point, you have all four building blocks of your quick lighting macro for webcam calls. Now we need to compress them into a single, memorable sequence you can run without thinking. The key is to keep the order identical every time so your body learns it like typing a password.
In practice, your macro might look like this:
You sit down, turn your main light to its preset position—45° off to one side, slightly above eye level, aiming for soft, even illumination. You immediately adjust your distance to about an arm’s length from the camera. You check that your eyes land in the top third of the frame with just a bit of headroom, and that your shoulders are angled about 15° for a natural stance.
Next, you glance at your preview and quickly judge skin tone and clarity. If the image looks overly warm or cool, you make one tiny correction. You check for glasses glare; if you see reflections, you nudge your light slightly higher or tilt your head until your eyes are fully visible. You give your lens a fast wipe to clear any smudges. This might sound like a lot, but in practice it’s just three swift checks.
Finally, you switch into presence mode. You look straight into the camera, apply a micro-smile, take a deliberate breath, drop your shoulders slightly, and adjust your chin so your posture feels grounded. At the end of those few seconds, you’re not just technically ready; you feel camera-ready.
💡 Nerd Tip: Write your macro on a sticky note for a week: “Light → Frame → Color → Presence.” After a few days, you won’t need the note anymore.
🚀 PRO Mode: If You Want This to Be 10 Seconds Total
Once the 60-second version feels natural, you can compress it even further by pre-baking parts of the macro into your setup. The idea is to move as many decisions as possible from “every call” to “once and done.”
First, create a pre-lit desk. Fix your main light in a permanent spot so you don’t have to move it. Mark the edge of your desk with a tiny sticker where your laptop or tripod should sit so the camera is always at roughly the same height and distance. Over time, this can cut your lighting micro-adjustments down to almost zero.
Second, use a fixed camera arm or stand. A cheap articulated arm or a phone clamp (if you use your phone as a webcam like in the always-on webcam guide) lets you lock in height and angle. When the physical position never changes, you won’t waste time re-leveling the shot.
Third, lock down your digital settings. Most apps let you set manual or “preferred” white balance, exposure, and sometimes even a “touch up” level. Spend 15–20 minutes dialing these in once. After that, your 10-second macro becomes mostly a confirmation glance.
Finally, if you stream or record frequently, consider building a “One-Click Scene” in tools like OBS or in the presets of your video-conferencing platform. That way your lighting, camera source, and framing can be recalled in a single step, similar to how creators recall entire scenes in their livestream production setups.
💡 Nerd Tip: The real PRO move isn’t more gear—it’s more defaults. The fewer knobs you touch per call, the more consistent your on-camera brand becomes.
🟩 Eric’s Note
I don’t think most people want to look like influencers on calls—they just don’t want their camera to be the thing they apologize for. A tiny macro you’ll actually run beats a “dream setup” you never finish wiring.
📬 Want More On-Camera Pro Tips Like This?
Join the free NerdChips newsletter and get weekly, no-nonsense tips on webcam setups, creator workflows, and future-facing tools that make you look and sound sharp online.
🔐 100% privacy. No noise. Just value-packed creator and remote-work tips from NerdChips.
🧠 Nerd Verdict
A quick lighting macro for webcam calls is the kind of tiny system that quietly changes your workday. Instead of debating whether you “look okay” before every Zoom, you just run a 60-second sequence and trust the outcome. That frees up brainpower for what actually matters: leading the meeting, landing the client, teaching the class, or streaming for your community.
What makes this powerful isn’t perfection—it’s consistency. You don’t need cinematic bokeh or RGB walls like a full-time streamer. You need light that flatters, framing that respects you, and a presence reset that reminds your nervous system you’re ready. Combined with better meeting habits and sharper tech workflows like the ones we share across NerdChips, this small macro becomes part of your on-camera identity.
💡 Nerd Tip: Every time you upgrade your gear or layout, update the macro—but never abandon it. The system is the real upgrade, not the lamp.
❓ FAQ: Nerds Ask, We Answer
💬 Would You Bite?
If you had to design your own 60-second camera-ready macro today, which step would make the biggest difference—light, framing, color, or presence?
And what’s one tiny change you’re willing to test on your very next call? 👇
Crafted by NerdChips for creators and teams who want their best ideas to travel the world.